

YouTube Marketing: The Ultimate Guide

So, you’ve decided to create a YouTube channel. Great! We can’t wait to see the amazing content you promote. Before we dive in, it’s important to note that maintaining a YouTube channel takes a lot of time and planning. Are you ready for it?
Unlike other social networking platforms, YouTube exclusively hosts video content. If you’re creating a YouTube channel to merely upload one video and have no intention of maintaining the platform, you might want to reconsider.
You’ll need to set aside plenty of time to plan, film, edit, market, and analyze your content on a consistent basis. You’ll also need to define your brand’s goals and plan for how video can specifically help you achieve these. If you can devote an appropriate amount of time and energy into the platform, you’ll be able to create engaging, shareable content for your growing audience.
Creating a Google Account
Before you start filming video content, you’ll need to set up your YouTube channel. This can get a bit complicated. As you probably know, YouTube is owned by Google. As a result, when you sign up for a Gmail account, you automatically gain access to a YouTube account, a Google+ account, and much more.
Depending on your business, you may not want to tie your email to your business’s YouTube channel — especially if you need to share access to the account with team members or an agency partner. We suggest that you create a common email account that can be used by multiple people.
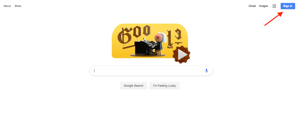
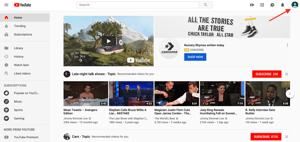
To get started, visit Google and click “Sign in” in the upper right-hand corner.
Click on “Create account” at the bottom of the page.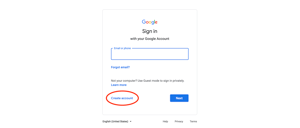
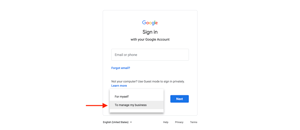
You’ll see an option pop up to create an account for yourself or to manage your business. Since your YouTube account will be for your business, choose “To manage my business”.
To officially create your Google account, enter your name and desired email and password before clicking “Next”. Then, enter a recovery email and your birthday, gender, and phone number. Note: Google requires all users to be at least 13 years old.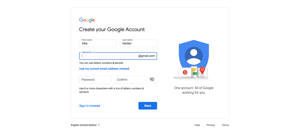
Lastly, agree to Google’s Privacy Policy and Terms of Service and verify your account with a code sent via text or phone call. Congrats! You’re now the proud owner of a Google account.
Creating a YouTube Brand Account
Now that you have a Google account, you’re almost ready to publish some awesome video content.
But, we’re not done quite yet — you now need to set up a YouTube Brand Account. A Brand Account allows users to manage editing permissions and create a more holistic online presence.
To get started, visit YouTube. In the upper right-hand corner, note that you’re probably already logged into your new Google account. (If you’re not, click “Sign in” and enter your new Google account username and password.)
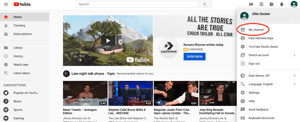
Once you’ve signed in, tap your account module and click “My channel” in the drop-down menu.
You’ll see the option to create a channel right away. Do NOT enter your name and click on “Create Channel”. Instead, click on “Use a business or other name” at the bottom.

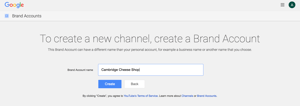
Now, you should be prompted to create a Brand Account. Enter your Brand Account name and press “Create”. Note: You can always update or change your channel name from your account settings, so don’t worry if you aren’t 100% sure about your selected label.
Customizing Your YouTube Brand Account
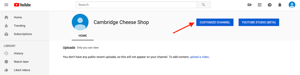
Now, let’s customize your Brand Account. Click on “Customize Channel” to get started.
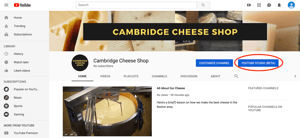
Start by adding a channel icon and channel art. These will be the first parts of your YouTube account that users see when visiting, so be sure to use images that are easily recognizable and consistent with your overall branding.
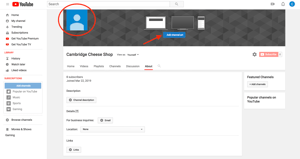
To add a channel icon, click on the default blue profile picture in the upper left-hand corner of your channel to upload an image. Note: It may take several minutes for your channel icon to appear after uploading.
Next, upload your channel art. Click on the blue “Add channel art” button in the center of your channel. Check out YouTube’s channel art templates for specific design guidance.
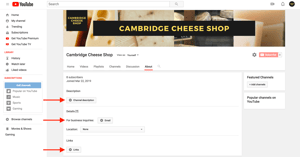
After you upload your channel icon and art, add a channel description, a company email, and links to your company website and other social platforms under the “About” tab.
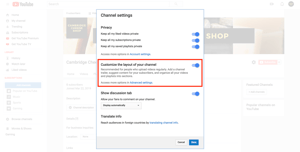
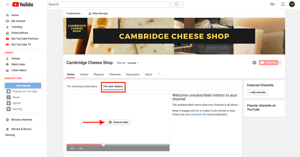
With the basic profile complete, it’s time to add a few finishing touches! Before we move on, it’s important to get one thing straight — you can customize the way your YouTube channel looks to subscribers and unsubscribed visitors. This means that unsubscribed viewers would see different featured content than dedicated, subscribed viewers. Pretty cool, right?
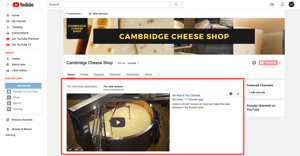
One of the main ways you can take advantage of this feature is by creating a YouTube channel trailer. A channel trailer is the video version of your description and is shown to all your unsubscribed viewers.
Ready to get started? First, make sure channel customization is turned on. To do this, click on the gear icon next to the red “Subscribe” button in the upper right-hand corner of your channel.
Next, make sure the option to “Customize the layout of your channel” is turned on and press “Save”.
Now that you’ve set up your channel for customization, upload your trailer. Click the arrow upload button in the upper right-hand corner and select your video file. Remember to add keywords to your trailer name and description.
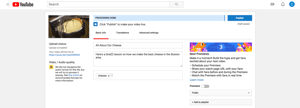
Once your video uploads, click on the “For new visitors” tab on your channel homepage. Then click “Channel trailer”.
Finally, select your uploaded trailer, or enter a URL to a video you’d like to feature, and press “Save”.
Setting Permissions for Your YouTube Brand Account
Before you start implementing your YouTube marketing plan, you should decide who on your team will need access to the account. Granting access to team members will allow them to help manage the channel through their own Google accounts.
When you grant access to a Google account, there are three options for roles:
- Owner: Owners have full editing power over all company Google properties. They can add or remove managers, edit business information, respond to reviews, and more.
- Manager: Managers have the same editing powers as Owners, except they cannot add or remove page roles or remove listings. Anyone editing a YouTube channel must be a Manager or an Owner.
- Communications Manager: Communications Managers can respond to reviews and do several other actions but they cannot use YouTube’s video manager, upload content, or view analytics.
To add individuals to your account, tap your Google account icon in the upper right-hand corner to open the drop-down menu and go to “Settings”.
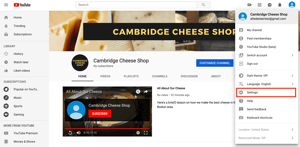
Click “Add or remove managers”.
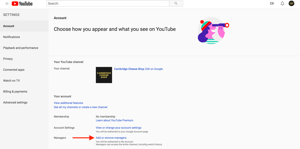
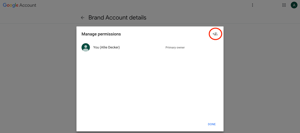
Click “Manage Permissions”.
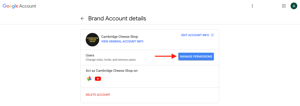
Then, select the people icon in the upper right-hand corner to invite new users. To grant permission to a person, enter their Gmail address and indicate their role.
How to Create a Second YouTube Channel
Looking to create another channel from the same Google account? Good news: YouTube lets you do this. Perhaps you want a separate channel for personal videos, or you’d like to start a second brand under the same business entity. Either way, the process is easy. Here’s how:
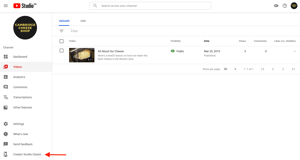
- Go to your YouTube Studio account and open Creator Studio Classic
- Click your account icon in the top right-hand corner and tap the gear icon next to “Creator Studio”
- Under “Your account,” click “See all my channels or create a new channel”
- Click “+Create a new channel”
- Create and customize your new Brand Account (per our instructions above)
Title
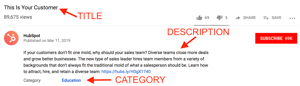
Just like with on-page SEO, it’s important to optimize your video’s title and description. Titles are what people first read when scrolling through a list of videos, so make sure yours is clear and compelling — it should make searchers curious about your content or make obvious that your video will help them solve a problem.
Do some keyword research to better understand what viewers are searching for. Include the most important information and keywords in the beginning of your title. Lastly, keep titles to around 60 characters to keep text from being cut off in results pages.
Description
YouTube will only show the first two to three lines (about 100 characters) of your video’s description. To read beyond that, viewers will need to click “Show more” to see the rest. For that reason, always include important links or CTAs in the beginning of your description and write the copy so it drives views and engagement.
Below this, include the video transcript. Video transcripts can greatly improve your SEO because your video is usually full of keywords. Add a default channel description that includes links to your social channels, video credits, and video-specific time stamps. You can also include #hashtags in your video titles and descriptions — just be sure to use them sparingly.
Tags
Next, highlight your main keywords in your tags. Tags associate your video with similar videos, which broadens its reach. When tagging videos, tag your most important keywords first and try to include a good mix of more common keywords and long-tail keywords.
Category
After you upload a video, YouTube will allow you to choose a video category under “Advanced settings.” Video categories group your video with related content on the platform.
YouTube allows you to sort your video into one of the following categories: Film & Animation, Autos & Vehicles, Music, Pets & Animals, Sports, Travel & Events, Gaming, People & Blogs, Comedy, Entertainment, News & Politics, How-to & Style, Educations, Science & Technology, and Nonprofits & Activism.
Thumbnail
Video thumbnails are the main images viewers see when scrolling through a list of video results, and yours can have a large impact of the amount of clicks and views your video receives. YouTube will auto-generate a few thumbnail options for your video, but we highly recommend uploading a custom thumbnail.
YouTube reports that “90% of the best performing videos on YouTube have custom thumbnails”. When filming, think of high-quality shots that accurately represent your video. YouTube recommends using a 1280 x 720 px image to ensure that your thumbnail looks great on all screen sizes.
Note: You must verify your YouTube account to upload a custom thumbnail image. You can do this by visiting youtube.com/verify and entering the verification code YouTube sends you.
SRT Files (Subtitles & Closed Captions)
Not only do subtitles and closed captions help viewers, but they also help optimize your video for search by giving you another opportunity to highlight important keywords. You can add subtitles or closed captions by uploading a supported text transcript or timed subtitles file. You can also provide a full transcript of the video and have YouTube time the subtitles automatically, type the subtitles or translation as you watch the video, or hire a professional to translate or transcribe your video.
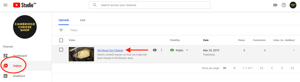
To add subtitles or closed captions, head to your channel and click on “YouTube Studio,” YouTube’s replacement for Video Manager.
Once inside your YouTube Studio, click “Videos” on the left menu. Find the video to which you want to add subtitles or closed captioning and click on the title to open the video settings.
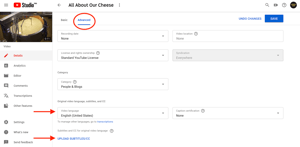
Open the “Advanced” tab, and choose the video language. Once you choose a language, the option to “Upload Subtitles/CC” should become available. Tap that option, and choose to upload your subtitles or closed captioning with or without timing.
Cards and End Screens (Annotations)
Instead of annotations (which they sunsetted in May 2017), YouTube encourages users to incorporate cards and end screens in their videos to poll viewers, link to external sites, or direct people to other videos.
Thankfully, cards and end screens are as easy to add as annotations. Cards are small, rectangular notifications that appear in the top right-hand corner of both desktop and mobile screens. You can include up to five cards per video, but if you’re including multiple cards, be sure to space them out evenly to give viewers time to take the desired action.
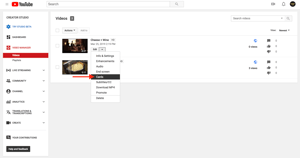
Cards aren’t yet available in YouTube Studio. To add cards, click “Creator Studio Classic” in the left menu to follow these steps.
Once in the Creator Studio, click the drop-down edit arrow next to your video and choose “Cards”.
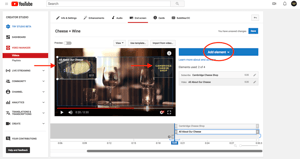
Then, click on “Add Card” and choose to create a Video or Playlist, Channel, Poll, or Link card. (Below is a Video card featuring a suggested link to another video on the channel.)
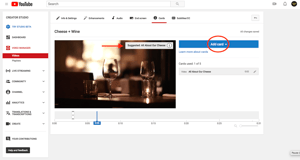
Once you’ve created your card, drag it to the spot in the video you want it to appear. Your changes will be saved automatically.
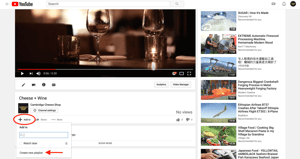
End screens allow you to extend your video for 5-20 seconds to direct viewers to other videos or channels on YouTube, encourage viewers to subscribe to your channel or promote external links, such as ones that direct to your website. End screens encourage users to continue engaging with your brand or content.
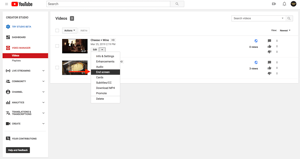
To add an end screen, head to your video manager, click the drop-down edit arrow, and choose “End screen”.
Then choose which elements you’d like to add to your end screen. You can add elements by importing an end screen you used in another video, using a template, or creating elements manually.
Note: YouTube requires users to promote another YouTube video or a playlist in part of the end screen.
Playlists
Are you creating videos around a few specific themes? Playlists might be the perfect tool for you! Playlists allow you to curate a collection of videos from both your channel and other channels. Not only do playlists help to organize your channel and encourage viewers to continue watching similar content, but they also show up separately in search results. Creating playlists provides you with more discoverable content.
To create a new playlist, go to a video you’d like to add and click “+Add to” under the video. Next, select “Create new playlist”. Type in the name of the playlist you want to feature and click “Create”.
Now that your YouTube channel is set up, it’s time to start populating it with content. This is where the fun begins!
In this section, we’ll talk about some different types of videos you can create and how to film and edit them. Overwhelmed? Feeling uninspired? Check out our list of great video advertising and marketing campaigns for creative ideas to inspire your next project.
Eight Types of YouTube Videos to Create
Before you start filming, decide what type of video would help you achieve your goal. In a recent article from the Huffington Post, companies seeing the greatest YouTube success ranked different types of videos by their importance and effectiveness. Below, we cover these videos as ranked in the article.
Before you brainstorming for, filming, and editing your videos, consider this list of video types.
#1 Customer testimonials
Customer testimonials are short-form interviews with satisfied customers. Customer testimonials can help build company and product credibility.
#2 On-demand product demonstration videos
Demonstration videos are short pieces of content showing the benefits and proper use of a product.
#3 Explainer and tutorial videos
Explainer videos are in-depth videos explaining how to use a product or various parts of a product or service. Tutorials can be used to answer customer support questions or explain a new product feature.
#4 Thought leader interviews
Interviews with experts or thought leaders can help amplify your company’s credibility in an industry.
#5 Project reviews and case studies
Project reviews or case studies recap a successful campaign or project and often include statistics and results.
#6 YouTube Live
YouTube Live allows users to broadcast live content to viewers. Live video allows you to easily share unfiltered moments and lets your audience participate with real-time comments and reactions. Live videos on YouTube are recorded and appear like any other video upload.
Go Live from your YouTube channel by clicking the camera+ icon in the top right corner and choosing “Go live”. 
#7 Video blogs
Video blogs are daily or weekly videos documenting daily life or events. You could also record a video that summarizes or highlights a blog post so your audience has multiple ways to digest the content.
#8 Event videos
Event videos feature in-person experiences at a conference or expo and can be a great way to show the excitement of a crowd.
Writing Your Video Script
1. Define your goal
Like for any good campaign or published content, it’s important to establish what you want to accomplish with your video before you get into the nuts and bolts of bringing it to life.
Do you want to increase awareness for your brand? Drive inbound website traffic? Add subscribers to your channel? Increase social shares? Or do something else entirely?
Establishing a singular goal at the start of the production process is key and will allow you to focus the video’s script and strategy on accomplishing it. It’s perfectly OK to have multiple goals for your YouTube channel, like increasing brand awareness and adding subscribers, but the best practice is to focus on one goal per video.
2. Create a storyboard and write the lines
Once you’ve established the goal for your video, put on your creativity hat and start working on your storyboard. A storyboard is like a blueprint for your video and serves as an outline for the shoot.
You’ve probably even seen one before. Storyboards look like comic strips and include rough sketches of different scenes paired with short descriptive information about the scene, camera position and motion, and dialogue. They vary in the level of detail included, but your storyboard should, at the very least, include:
- A frame for each major scene or location change
- Basic descriptive information about the scene (time of day, weather, mood of the characters, etc.)
- Lines for each scene
- Camera direction for motion and shot details (i.e. tight, medium, or wide shots)
3. Decide on additional multimedia elements
If your video is going to include graphics, title slides, or other multimedia elements, you should plan out the placement and content for those pieces in advance. These elements can be incorporated into your storyboards so the video’s content flows seamlessly.
4. Determine the video length
As you create your storyboard, you’ll also want to decide how long your video you should be. On YouTube, videos under two minutes receive the highest levels of engagement.
Your video should be just long enough to deliver the key messages that align with its goal. If you do create a longer video, experiment with how you present content — the pacing, story arc, and visuals — to keep viewers interested throughout.
5. Pick a filming location (or multiple)
You’ve determined your video goal, created a storyboard, and decided on the ideal video length needed to deliver your message. Now it’s time to find your filming locations.
In the film industry, this step is called location scouting, and like every other step in this process, it’s an important part of creating a compelling video. To get started, take a look at your storyboard, and create a list of the different locations each scene requires. Depending on your video concept, you may only need one location … or you may need a new location for each scene.
Friends, coworkers, and even family can be great resources here for finding the locations you need. Keep in mind that for some locations, like businesses and other private property, you will need permission from the owner to film. To keep things simple, it’s best to find your locations through people you know — at least for your first few productions.
Visit each location before the shoot. On your scouting trips, make sure you’ll be able to capture the kinds of shots you want for your video. Typically, it’s better to have more space so you can adjust the camera position as needed. You should also check for any loud or ambient noise like busy roads or air conditioning units that could interfere with your audio when filming, and consider the light and time of day. While the room might have sufficient light in the morning, you may need to bring a lighting kit in to film during the afternoon or evening.
Six Essential Tips for Shooting Quality Video
After all that prep work, it’s finally time to start filming your video. Don’t own a fancy camera or have budget to rent one? Don’t worry! Advances in smartphone cameras have made it possible to film great content with just a phone.
If you are filming your video with a phone, be sure to turn it sideways and film in landscape mode. This will prevent awkward cropping or framing when you upload the video to YouTube, which natively supports the landscape format. No matter what you’re filming with, these tips can help your video to look professional and stay engaging for your viewers.
Use a tripod
You want viewers to focus on your story, not the shakiness of the camera. For static shots, be sure to place your camera on a tripod or another level surface.
Set your camera to manual mode
If you’re able to, set your camera to full manual mode. This will allow you to adjust the focus and other settings as needed to properly expose and focus your shots.
Shoot from different angles and distances
For each scene, make sure you film from a few positions so you can edit between the clips. For an interview or video focused on a single individual, this may mean moving the camera from facing the scene head on to filming from a 45-degree angle.
You can also try to move the camera closer and further away or zooming in and out for more variety. Cutting between different angles and distances will keep your video visually interesting and engaging for your viewers.
Film more than you think you need
You can always cut out footage, but sometimes it’s not possible to go back and capture more. To make sure you have the clips you need, shoot multiple takes of each scene. To make sure you don’t miss a moment, count down from five before you start the action and before you finish recording.
Introduce motion
If you have a slider or Steadicam, try including camera movement to your video. Even subtle movement from left to right or in and out can add intrigue to your clips.
Use a good microphone
If you plan on having speaking in your video, be sure to use a high-quality microphone to capture the audio. There are many different microphone choices that record audio separately from the camera. There are even mics you can plug into your smartphone for better audio on the go.
Editing Your Video Content
Tools
There are many options for editing tools and software. Depending on your operating system, your computer may come with free editing software such as iMovie or Windows Movie Maker. These programs provide basic editing tools, like the ability to cut clips together, add titles, and add limited effects and color correction. There are also higher end, more expensive options such as Final Cut Pro X or Adobe Premiere CC, which offer an array of editing tools. YouTube even has its own online editing platform you can use to compile your clips and edit together your video.
Video Thumbnails
Once your video is ready to upload, YouTube allows you to select the video thumbnail that will appear on your channel, in search results, and on the right-hand column. We recommend uploading your own custom thumbnail — as we talked about above.
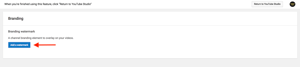
Watermarks
You can also add a custom watermark to all of your videos. To do so, navigate to the branding section of the Creator Studio. The watermark serves as a custom subscribe button that viewers can click anytime when watching your videos.
To add a watermark, go to your YouTube Studio and click on “Settings”.
Tap “Other settings” > “Channel branding”.
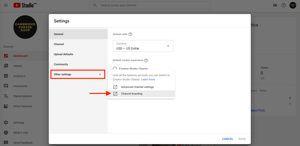
You should be directed to a screen where you can select “Add a watermark”. Follow the instructions to upload a file.
Music & Sound Effects
Professional quality music and sound effects can make the difference between a successful video and a seemingly amateur one. Fortunately, cinema quality sounds are now readily available, even if your videos don’t have Hollywood-size budgets.
When selecting music for your video, first consider the overall mood you’d like to create. Music is one of the most valuable tools for setting the tone of a video and often informs the editing style, camera movement, and on-camera action. If you’re introducing your brand to a new audience, you probably want to select music that is upbeat and energetic.
The second key part to picking music is obtaining the necessary permissions to use the song. What you’re looking for here are songs marked as “royalty free.” This doesn’t mean the music will be free, but it does mean you only pay a flat rate to use the music and won’t have to pay additional royalties or licensing fees on top of that.
YouTube has a library of free sound effects and music to use in your videos. Some other great resources for royalty free music are Pond5, Epidemic Sound, and PremiumBeat. Both services include thousands of professionally recorded and produced songs in a multitude of genres at varying lengths and tempos. PremiumBeat and Pond5 both include a large library of sound effects to add texture and depth to your videos. Sometimes, it only takes a subtle sound effect layer in the background of a scene to elevate the production quality of your video and really pull your audience into the story.
Now that you’ve produced a video and optimized it for search, let’s talk about how to market your YouTube channel and videos. While ranking high in search results and having a large subscriber base are ideal, those goals can be difficult to achieve when you’re just starting out.
That’s why it’s important to always spread the word about your YouTube channel and videos across other platforms. Fortunately, YouTube and other platforms make it easy to share video content. Below are some tips for how to best promote your YouTube content on other channels.
Social Media
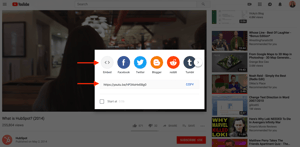
Sharing your videos on social is an easy way to add additional insights to your video and engage with viewers. YouTube makes it incredibly simple for you and others to promote your video across other social networks. To share a video, just click the “Share” tab underneath the video. There you can select where to market the video. YouTube even provides a shortened URL to your video for convenient posting.
When promoting your YouTube channel or videos on your social media sites, consider the best marketing strategy. Simply sharing the video on your timeline or feed may not be the most effective option. Think of why you made the video. Maybe you created a tutorial because users were asking a lot of questions about how to use your product.
In that case, it might be best to respond to those questions with a link to your video. If you created a video as part of a larger campaign or global trend, be sure to include relevant #hashtags where appropriate to ensure your video is included in the conversation. If you created a video to build awareness around your brand, consider posting the link in your profile bios.
Blog Posts and Website
Market your YouTube channel and videos on your website and blog. First, add a YouTube follow icon to your website and blog so your audience can easily find your channel. Second, embed relevant videos on your website or in blog posts. Consider creating a YouTube video to accompany a specific blog post or sharing customer video reviews or case studies on your website. Not only will this help market your YouTube channel and videos, but it will also drive traffic to your website.
To add a YouTube video to your blog or website, copy the embed code under the video you want to feature. Check out our step-by-step embed instructions here.
While you’re on the quest to find and attract new customers and leads, don’t forget about the ones you already have. Share your video content and channel with relevant email lists. Encourage your contacts to check out a blog post you’ve in which embedded a video to increase both the video and website traffic or direct them to a relevant playlist you’ve curated. Sending an email newsletter with valuable information and video content is another great way to keep your contacts engaged.
Q&A Sites
Do your videos help solve a problem or answer a question? If so, engaging with popular Q&A sites like Quora might be a great marketing technique for your business. Monitor questions and share video content users will find helpful.
Collaborate With Others
Does your company have a relationship with another company that has a great YouTube presence? Ask them to collaborate! Collaborating with others is a fun way for both channels to gain exposure to another audience. Create a video or playlist together. There are a lot of options to creatively collaborate with other brands, just make sure that their audience and goal is similar to yours. The partnership should align with your marketing strategy.
Engage With Viewers
Finally, be sure to engage with your viewers. Respond to comments, answer questions, ask for feedback, and thank viewers for their support. This is an easy task to forget or let fall by the wayside so try to choose a dedicated time to check video interactions and respond to users.
8 Tips to Market Your YouTube Channel and Videos
Above, we touched on some components to build a high-level marketing strategy for your YouTube videos. In this section, we’re going to discuss some tips for how to best promote your YouTube content.
- Keep your channel branding consistent with your other social media accounts
- Optimize your title and description for SEO and searcher intent
- Feature real people or animated faces in your videos, not just words or B-roll
- Choose a video thumbnail that accurately represents your video content
- Include calls-to-action (CTAs) in every video
- Make it easy for others to share your videos
- Create playlists that feature your videos and others
- Produce videos on a regular basis, and consider doing a video series
You’ve put a lot of time and effort into your YouTube channel. You’ve created interesting content, optimized it for SEO, and shared it across different platforms … now it’s time to measure your success.
YouTube Analytics can seem daunting at first. Let’s face it, interpreting a bunch of numbers and strange looking graphs can be pretty challenging. Thankfully, understanding YouTube Analytics is pretty straightforward once you know your way around.
Determine Your Goal
First things first, you can’t measure your success without determining your goal. If you’ve filmed, edited, uploaded, optimized, and shared your video and still don’t know what goal you’re trying to achieve, we have an issue. Your goal should drive your video strategy from beginning to end.
You should focus on targeting one goal per video (as we talk about here). Some of the most common video goals are to increase brand awareness, views, clicks, or inbound links or social shares. Depending on how you use the video in your marketing material, the goal could be to increase the open rate of an email series or improve the conversion rate on a landing page. YouTube is a great platform for growing brand awareness.
As the world’s second largest search engine, YouTube allows your videos to be seen through organic search or paid advertising. Video is a great way to humanize your brand by showcasing real employees, customers, or partners. It also allows you to build credibility by publishing informational content that helps your target buyer. Promoting your videos through paid advertising versus organic search can impact the type of video you should create. If you’re planning to increase awareness organically, consider filming the history of your company, customer reviews, or product tutorials.
Key Metrics to Track
Now that we’ve talked about why determining a goal is so important, we can discuss how to effectively measure success. At first glance, YouTube analytics can be pretty overwhelming. On the flip side, it’s frustrating when you post a video and don’t receive as many views or as much engagement as you were expecting. YouTube analytics shows you how viewers found your content, how long they watched it, and how much they engaged with it. Let’s start by going over what exactly you can measure and how to find it.
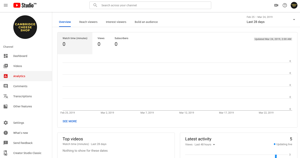
First, head to youtube.com/analytics. You should be directed to an analytics dashboard that shows an overview of how your videos have been performing during the past 28 days. You can adjust the analytics timeframe by clicking on the drop-down menu in the upper right-hand corner. The overview report features some top-line performance metrics, engagement metrics, demographics, traffic sources, and popular content.
You can also filter your results by content, device type, geography or location, all video content or playlists, subscriber status, playback type, traffic by different YouTube products, and translations. In addition to filtering results, YouTube allows you to display your results in a variety of different charts and even an interactive map.
While there’s no one-size-fits-all approach for reporting and measuring the success of a campaign, below are a few key metrics that you should pay attention to.
Watch Time and Audience Retention
Watch time reports the total number of minutes your audience has spent viewing your content on your channel as a whole and by video. This helps you see what pieces of content viewers are actually consuming instead of just clicking on and navigating away from.
Watch time is important because it’s one of YouTube’s ranking factors. A video with a higher watch time is more likely to rank higher in results. YouTube provides a line item report on watch time, views, average view duration, and average percentage viewed for individual videos, location, publish date, and more.
A video’s average percentage viewed, or retention rate, indicates the average percentage of a video your audience watches per view. A higher percentage means there’s a higher chance that your audience will watch that video until the end. Try placing cards and end screens in videos with a higher average percentage viewed rate to improve the number of views your calls-to-action receive.
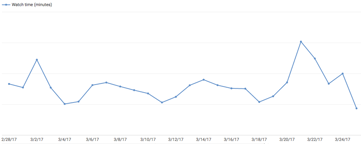
Sample watch time line chart
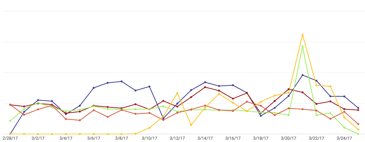
Sample watch time multi-line chart
Traffic Sources
The traffic sources report shows how viewers are finding your content online. This provides valuable insight on where to best promote your YouTube content. For example, you can see if viewers are finding your content through YouTube search or Twitter. To view more in-depth traffic reporting, click on the overall traffic source category. This data can help refine your YouTube marketing strategy. Be sure to optimize your metadata based on your findings.
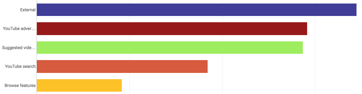
Sample traffic sources overview bar chart
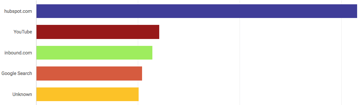
Sample external traffic sources bar chart
Demographics
The demographics report helps you understand your audience by reporting on their age and gender. You can then break down age groups and genders by other criteria such as geography. This report will help you better market to your YouTube audience and understand if your content is resonating with your established buyer personas.
Make your videos marketing stronger with buyer personas. Download our free Persona Templates here.
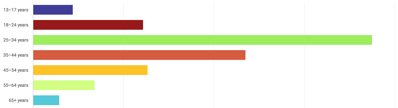
Sample demographics bar chart
Engagement Reports
Engagement reports help you learn what content is resonating with your audience. Here you can see what viewers are clicking, sharing, commenting, and promoting. You can also see how your cards and end screens are performing in your engagement reports. Cards and end screens reports help you learn what your audience is engaging with so you can optimize your calls-to-action in future videos.
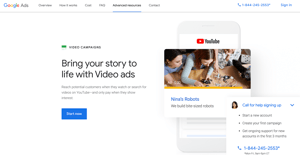
In addition to driving organic traffic to your content, there are also several paid options for promoting your video on YouTube. In this section, we’ll dive into some of the basics on how to run a YouTube advertising campaign.
Cost of Advertising on YouTube
YouTube uses a cost per view (CPV) model, which means you only pay when someone engages with your video ad. If your ad is skipped, you aren’t charged for that view. The exact cost per click varies varies on keyword competitiveness, but, on average, it’s around $0.06. Once you set your daily campaign budget, YouTube will display your ad until the daily budget is spent.
Types of YouTube Ads
#1 Video Discovery Ads
TrueView video discovery ads appear on the YouTube homepage, within search results, and as related videos on YouTube video watch pages. When a user clicks on one of these ads, they’re redirected to the promoted video.
#2 In-Stream Ads
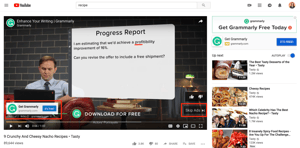
In-stream ads refer to ads that play within a YouTube video. TrueView in-stream ads play before a viewer watches the video they’ve selected on YouTube. These ads can be customized with different overlay text and CTAs, and viewers usually have the option to skip the ad after watching the first five seconds. In addition to the pre-roll in-stream ads that play before the video, there are also mid-roll video ads that appear midway through YouTube videos that are 10 minutes or longer.
See a full list of the advertising options on YouTube here.
Setting Up Your YouTube Ad Campaign
You can create a campaign using any video you’ve uploaded to your YouTube channel.
First, go to your Google AdWords account and select “New Campaign” to get started.
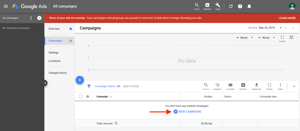
Select “Video” as your campaign type.
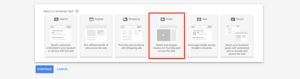
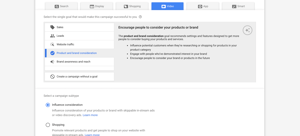
Next, select a goal to access suggested campaign settings as you walk through the setup process. You can choose Sales, Leads, Website traffic, Product and brand consideration, or Brand awareness and reach.
Sales, Leads, and Website traffic require conversion tracking. Product and brand consideration and Brand awareness and reach offer campaign subtypes to further customize your campaign’s goal.
Note: You can also proceed without a set goal, although Google Ads won’t provide step-by-step suggestions.
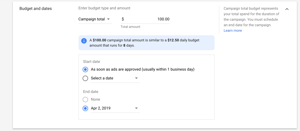
Next, choose a name, budget, and timeline for your campaign. In this step, you’ll also choose your bidding strategy, ad networks, and target language(s) and location(s). You can also define any content exclusions, choose which devices you want your ad shown on, and cap the frequency of your ads.
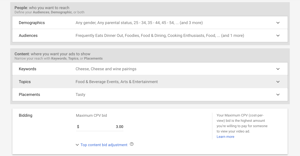
Scroll down to build your ad. Name your ad group and set the demographics for your audience. You can also set keywords, topics, and placements to further narrow your campaign reach. Finally, decide on a bid for your ad.
Lastly, create your video ad. Input the URL for your video and choose your video ad format. Indicate where you want your viewers to go if they click on your ad — and don’t forget a CTA.

Click “Save & Continue” to review your ad. Congratulations! Your YouTube ad campaign is ready.